Difference between revisions of "EBJ-B (LRM - 1)"
| (14 intermediate revisions by 3 users not shown) | |||
| Line 1: | Line 1: | ||
| − | + | ==BUILD:== | |
:[[File:EBJ-B Skirmish 1F.png|border|800px]] | :[[File:EBJ-B Skirmish 1F.png|border|800px]] | ||
| − | + | ==SKILL TREES:== | |
| − | * | + | *Operations Tree: [[Operations Skill Tree (Config - 04) - 17 Nodes]] |
| − | * | + | *Survival Tree: [[Survival Tree Moderate (Config - 05) - 18 Nodes]] |
| − | *Sensor Tree : | + | *Sensor Tree: [[Sensors Tree (Config - 01) - 4 Nodes]] |
| − | * | + | *Mobility Tree: [[Mobility Tree (Config 05) - 21 Nodes]] |
| − | *Firepower Tree: | + | *Firepower Tree: [[Missile Brawler (Config - 02) - 28 Nodes]] |
| − | + | ==COMMENTARY:== | |
Why would you do this to a poor EBJ, You're a monster. | Why would you do this to a poor EBJ, You're a monster. | ||
| Line 24: | Line 24: | ||
This build is fairly hot so you might need time to back off and cool down. If using this you should focus on actually getting your own locks and trying to stay just out of reach of the enemy mechs. Just remember that your 5 cERML actually do more viable damage than LRMing from the back, feel free to hit available targets with LRMs while pushing into contact or positioning if you don't have a clear shot. Just remember that your LRM arc tends to be more forward than up in many cases. | This build is fairly hot so you might need time to back off and cool down. If using this you should focus on actually getting your own locks and trying to stay just out of reach of the enemy mechs. Just remember that your 5 cERML actually do more viable damage than LRMing from the back, feel free to hit available targets with LRMs while pushing into contact or positioning if you don't have a clear shot. Just remember that your LRM arc tends to be more forward than up in many cases. | ||
| − | For something that's a bit more viable in some ways you might want to look to the [[EBJ-B (Skirmish - | + | For something that's a bit more viable in some ways you might want to look to the [[EBJ-B (Skirmish - 6)|ATM version]] of this build, just be aware that while the damage might be higher you're loosing out with; low ammo, minimum range, 1 cERML, and poor damage/ton at longer ranges. |
| − | [[Category:Ebon Jaguar - EBJ | + | [[Category:Ebon Jaguar - EBJ]] |
Latest revision as of 16:08, 14 December 2018
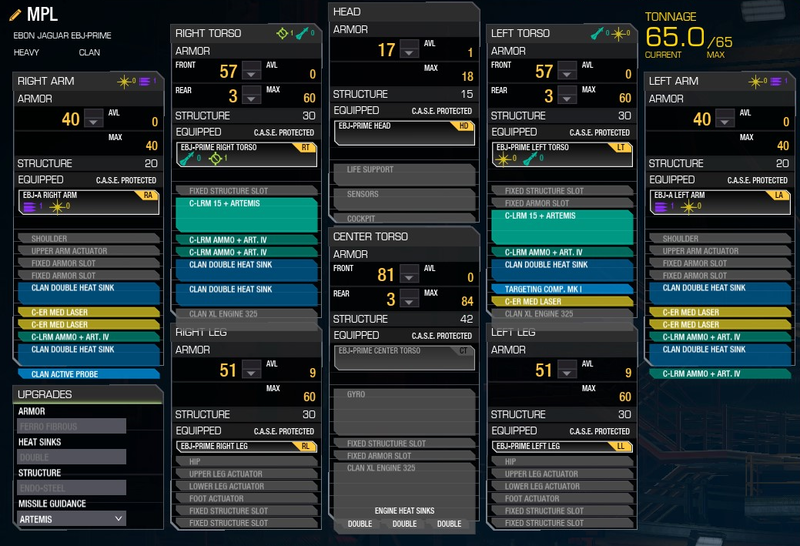
BUILD:
SKILL TREES:
- Operations Tree: Operations Skill Tree (Config - 04) - 17 Nodes
- Survival Tree: Survival Tree Moderate (Config - 05) - 18 Nodes
- Sensor Tree: Sensors Tree (Config - 01) - 4 Nodes
- Mobility Tree: Mobility Tree (Config 05) - 21 Nodes
- Firepower Tree: Missile Brawler (Config - 02) - 28 Nodes
COMMENTARY:
Why would you do this to a poor EBJ, You're a monster.
While LRM bulids aren't particularly useful they might be needed in one situation or another. Stick to 300-500 and chainfire your LRMs to conserve heat while you single out open components with your cERML.
This build is fairly hot so you might need time to back off and cool down. If using this you should focus on actually getting your own locks and trying to stay just out of reach of the enemy mechs. Just remember that your 5 cERML actually do more viable damage than LRMing from the back, feel free to hit available targets with LRMs while pushing into contact or positioning if you don't have a clear shot. Just remember that your LRM arc tends to be more forward than up in many cases.
For something that's a bit more viable in some ways you might want to look to the ATM version of this build, just be aware that while the damage might be higher you're loosing out with; low ammo, minimum range, 1 cERML, and poor damage/ton at longer ranges.
