Difference between revisions of "EBJ-B (Skirmisher - 6)"
From Mercstar Wiki
(Created page with "''BUILD:'' :800px ''SKILL TREES:'' *Mech Operations Tree: TBD *Armor Structure Tree: TBD *Agility Tree: TBD *Firepower...") |
|||
| Line 5: | Line 5: | ||
''SKILL TREES:'' | ''SKILL TREES:'' | ||
| − | |||
| − | * | + | *Mech Operations Tree: [[Mech Operations Skill Tree (Config - 4) - 11 Nodes]] |
| − | *Agility Tree: [[ | + | *Armor Structure Tree: [[Survival Tree Moderate (Config - 4) - 17 Nodes]] |
| + | |||
| + | *Sensor Tree : Focus on getting Target info gathering and target decay, 2 points of radar deprivation will also help in some circumstances. | ||
| + | |||
| + | *Agility Tree: [[Agility Tree (Config 6) - 19 Nodes]] | ||
| + | |||
| + | *Firepower Tree: Grab Missle Rack, range, and heatgen nodes. Duration will help with cERML duration if possible. High Explosive is also nice to have. | ||
| − | |||
''COMMENTARY:'' | ''COMMENTARY:'' | ||
| − | + | Slightly better than [[ |LRM build]] with some drawbacks. | |
| + | |||
| + | Somewhat heatcapped and short on ammo due to ATM's ammo per ton. DO NOT SHOOT PAST 500M WITH YOUR ATMs, the damage drop off from 2 to 1 damage happens at this range. Ideally you want to sit between 200-400m to get the maximim effective value out of all your weapons. | ||
| + | Remember ATMs fly flatter than LRMS and you'll be more likely to be hitting teammates for 3 damage per missile in the back. Hold your fire unless you've got a clear line of sight. | ||
[[Category:Ebon Jaguar - EBJ]] [[Category:Incomplete]] | [[Category:Ebon Jaguar - EBJ]] [[Category:Incomplete]] | ||
Revision as of 19:03, 12 August 2017
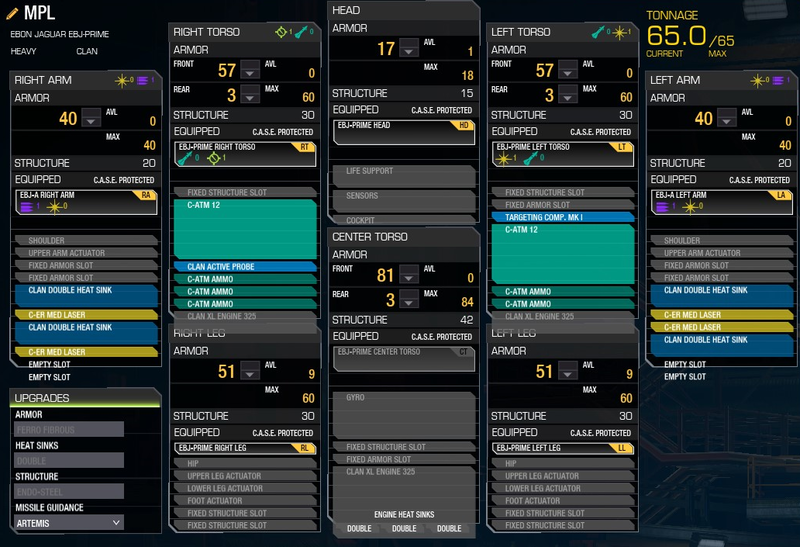
BUILD:
SKILL TREES:
- Mech Operations Tree: Mech Operations Skill Tree (Config - 4) - 11 Nodes
- Armor Structure Tree: Survival Tree Moderate (Config - 4) - 17 Nodes
- Sensor Tree : Focus on getting Target info gathering and target decay, 2 points of radar deprivation will also help in some circumstances.
- Agility Tree: Agility Tree (Config 6) - 19 Nodes
- Firepower Tree: Grab Missle Rack, range, and heatgen nodes. Duration will help with cERML duration if possible. High Explosive is also nice to have.
COMMENTARY:
Slightly better than [[ |LRM build]] with some drawbacks.
Somewhat heatcapped and short on ammo due to ATM's ammo per ton. DO NOT SHOOT PAST 500M WITH YOUR ATMs, the damage drop off from 2 to 1 damage happens at this range. Ideally you want to sit between 200-400m to get the maximim effective value out of all your weapons.
Remember ATMs fly flatter than LRMS and you'll be more likely to be hitting teammates for 3 damage per missile in the back. Hold your fire unless you've got a clear line of sight.
